
Well, I never got around to doing more napkin pumpkins. I simply ran out of time. We ended up hosting family for Thanksgiving in our new home, so it was all hands on deck to get more boxes unpacked and tossed out.
Our new sleeper sofa arrived two weeks earlier than expected – yay!! It was not in time for Thanksgiving company, but it ended up not being a big deal as everyone was occupied doing this or that for most of the day and the only one who did much sitting was my dad. Thankfully the loveseat was already here.
We ended up making another purchase that I never expected I would ever consider – a faux Christmas tree! Normally I am all about the experience of going to the tree farm (or in our case more often than not, Home Depot) and picking out a live tree. I love the scent of live trees!!
It is hard to say what truly caused me to consider it enough to discuss it with Mr. Beck, but there were at least two reasons. First, the idea of having a live tree with Honeybunch in the life stage she is in was completely overwhelming. She does not acknowledge the word “no” like our first two, lol. Frankly, I just do not know how we are going to reach an understanding there other than constant repetition and consistency. Second, a friend of mine that I have reconnected with after years of living in different areas and never crossing paths, encouraged me to visit an annual Christmas event held at a local museum and it opened my eyes to all the creative ways you can decorate faux trees. The unfortunate truth about real trees is that ornaments have to be super lightweight or they will weigh down the branches and it just won’t look pretty. Faux trees simply do not have that problem.
So, we considered it and ended up purchasing a beautiful pre-lit, nine foot tree and it was delivered on December first. I have spent each week since then (read: all month) trying to decorate the whole thing, lol, because it is the largest tree we have ever gotten/owned and there is a lot of it! I have wanted for years to start making some homemade ornaments and decorations and this seemed like a perfect time to do it…though I highly recommend not waiting until the month of December, lol.
As of right now I would say it is pretty much as done as it will be this year especially considering we have to keep the bottom 1/4 or so bare due to Honeybunch and her curiosity.
Now, not all of the ornaments/decorations are homemade. I did purchase a few things on sale at Hobby Lobby. There were some things I bought from Dollar Tree and then I used a few of our older ornaments and a bunch of picks I had collected through the years. My friend came over to help because I have never decorated like this before and felt a little lost. She even stuck a few random decor pieces in the tree that are not necessarily Christmas items. It was so fun working with her and seeing how her mind works!
Most of the homemade ornaments are made with twine and wood beads…that is it. I wanted a very natural look. Lovebug and I also made some ornaments together that look like amber glass. The tutorial I found was so easy to follow, but it was considerably more time consuming than I anticipated and, since I had to run some errands that day, the last step was not followed to the letter, so I have some mixed feelings about the overall results. They are pretty – just not as pretty as they could have been if I had drained them longer and/or rotated them more often as they dried in the oven.
One of the projects I am super proud of that I will share here are some large balls that I customized. Here is the supply list:
- Smooth Fōm balls in the diameter of your choice (mine are 5.6 in and I found them at Hobby Lobby in the craft section)
- copious amounts of hot glue sticks (I lost track of how many I used and they’re the long ones)
- hot glue gun (I recommend getting something with a finer tip than mine – it might save you some glue and burnt fingers)
- twine (I bought mine at Dollar Tree and the quantity is determined by the number and size of the balls you are using. Another note here, their twine is two different sizes – the thicker twine is 8 ft long and the thinner twine is 9.5 ft long.)
- nautical rope (another Dollar Tree purchase and same thing here – I cannot provide a specific quantity because it will vary depending on the number and size of the the balls you are using. It also depends on whether or not you separate the three strands or leave them together – I separated mine so my supply went further and the final product looks more farmhouse and less nautical.)
- finger protector (Dollar Tree sells little pink silicone finger protectors to help with working with hot glue. I go back and forth on whether or not it is really that helpful, but on this project it definitely was.)
- pair of sharp scissors
- patience and maybe a Christmas movie or two or three…
Now, it is impossible for me to hold the phone (camera) and work at the same time, so I do not have a ton of photos to share here. However, a lot of pictures really are not necessary as you are simply wrapping the twine and rope around the balls and gluing it down as you go. That is it. You can do it in any pattern you want. I kept it pretty simple so that I did not have to cut the twine/rope any more than necessary. It was just easier to do a whole length, switch to the other medium and use that whole length and then finish off with the first one. One note that I will show in the picture is how I tried to be super intentional with the transition spots as far as keeping them on the same side. This just ensures that there is a back you can stick into the tree and the pretty side is seamless. Final note: you can (if you choose) use a lighter to burn off some of the scratchy pieces of the twine when you are done. I was nervous to try it the first time I used twine for a project, but I found very quickly that it works really well and nothing went up in flames. I did it over the kitchen sink, but you could also do it outside. Alrighty, here are some pictures..


The following pictures are of the finished products. I only did two designs – three balls have twine, rope, twine and two of them have rope, twine, rope. I may add one or two more next year, but I plan to wait until I can get the styrofoam balls on sale.
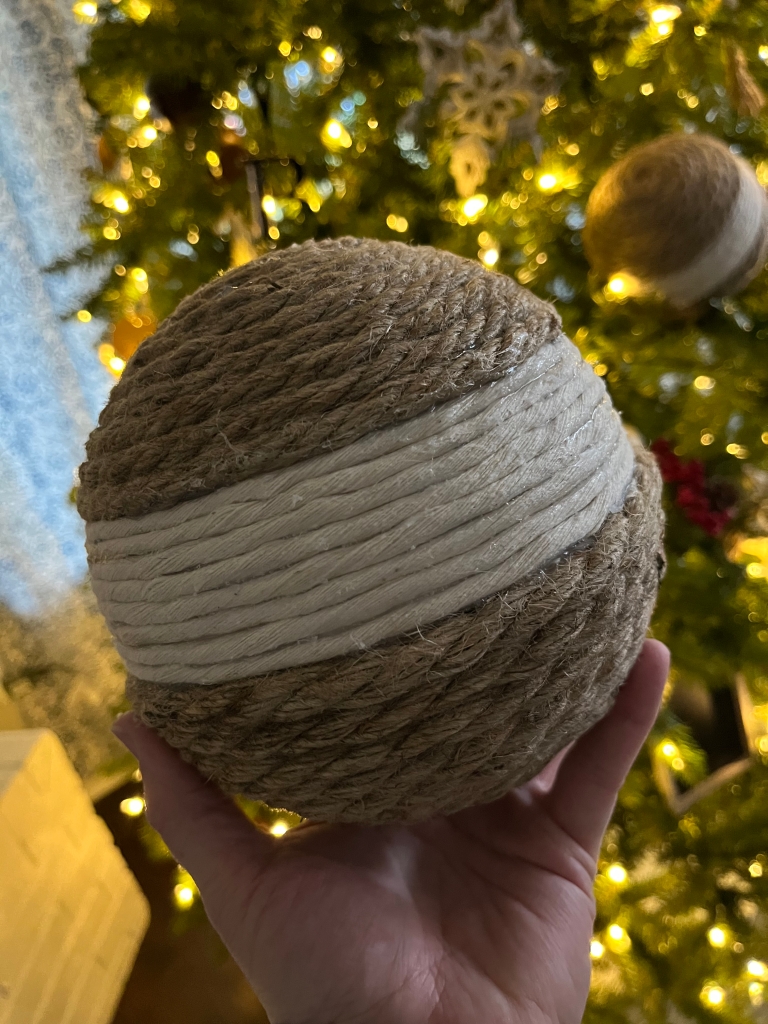

You can see how the possibilities are endless with the design! If you have the time for it, I think it would have been lovely to have multiple stripes rather than just one, but I made the first one in a hurry during nap time and then felt I should keep it consistent. They are sooo big, but it works really well in the tree we have and I actually have room for a couple more…but next year, lol. So, the average cost per ball was $6.58 not including the cost of the hot glue (since I have no idea how to even quantify that) or tax on the supplies. I think it is easy to say that it would cost considerably more to purchase these pre-made in a store!
I have just a few finishing touches to complete on the tree before I share pictures of it, but I did not want any more time to pass before sharing these. Hopefully, you found it helpful or inspiring.
It is my prayer that you are having a blessed Christmas season and that you will be able to celebrate with those you love! God bless!
